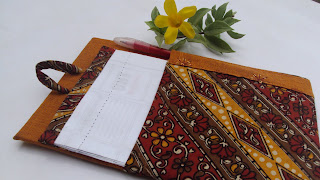
Yesterday when I walked into the room i found a cardboard lying in the corner. I kept it aside thinking its useful for many things. Yeah many things...like every usual mom million things in my head. Million other task to do throughout the day. Finally i tend to forget the most important thing. So I decided to make a 'Do list' fits into my hand bag. I can carry with me at all times and hang it anywhere.
Recycle material:
Old Cardboard
Old Calender/Recycle paper
Two scrap fabric
Fabric A
Fabric B
Glue
Knife or scissor
Matching thread to sew.
Lets start with Recycling calender
I used old calender,they are very useful as backside of the calender is blank. Why not use it again, usually i keep them for my son for scribbling and painting.
I cut 5"x 8" paper for the notebook, you can staple them.
Cut a Fabric B 2"x 7" long strip, I folded the raw edge about 1/4" and sew both the end.(if you like you can just glue them directly to the header of the notebook.)
Now spread the layer of glue on wrong side of the stripe and place the header of notebook on it and press the fabric on two side together.
One inch below the header sew long stitch without thread in the sewing machine. So you can easily tear off the paper.
Notebook is ready. keep them aside.
Do-list Holder:
Cut the cardboard 6"x9" . Make hole on the top-center of the cardboard. Each hole are one inch apart.
You can just glue the fabric on the cardboard if you like.Im a person avoid sticky hands and prefer the neat work both side of cardboard.
Cut the Fabric A 13"x11.5" to sew like a pocket/tote, first fold the bottom of the fabric
Now fold fabric again into half, rightside facing each other sew the raw edge.
Turn right side out and insert the cardboard carefully into the pocket/tote and handsew the bottom.
Cut Fabric B 1.5"x2" long stripe, fold the raw edge and sew.
Insert the strip slow through the fabric(make small hole in fabric) and cardboard.
Put a knot on the back. So you can hang it anywhere.
Fold behind the top raw edge of the fabric pocket and handsew. So the knots are covered under the fold.
Cut Fabric B 7"x7" pocket for notebook. Fold over all four raw edges and sew.
Sew the pen pocket stripe on the fabric B on leftside or rightside of your choice.
Place the note book pocket on the front of the card board holder (as shown above).
Ensure rightside of the fabric up and place it 3" down from the top.Now folded up the corners, then glued the sides and then finally the bottom. Don't pull it too tight, leave the pocket a little loose to slip in the note pad.
Now the DO list holder is ready you can slip the notebook into the pocket.
Yeah you can hang it anywhere and carry it you every where.
Isn't fabulous recycling?

Are you ready to try some recycling now...


It is great. I love the fabric that you chose. Thanks for linking up to Show and Tell Saturday at Be Different...Act Normal
ReplyDeleteThat is just fabulous! And what a wonderful tutorial! Thanks for sharing ... I've posted a link.
ReplyDeleteExcellent idea and well done, you clever woman. Wonderful.
ReplyDeleteToo useful! Such small creative things can bring a change to your otherwise routine life :) Keep going! Good to see your network growing! Best wishes :)
ReplyDeleteGreat use of materials and what a super idea!!!! I popped over from Metamorphsis Monday to say hi.
ReplyDeleteThat is pretty darn cute! It would be so cute in Christmas fabric to keep your Christmas list handy too!
ReplyDeleteThis is so darling, very clever idea! Visiting from its so very cheri
ReplyDeletejustsewsassy.com
great idea!!!!i have to do one!!!!
ReplyDeleteThis is a great project, I'm excited that it is mostly recycled materials!! I actually have a reuse challenge coming up on my blog starting next week Wednesday and was wondering if it would be ok if I featured this project? Let me know lifelovegreen@gmail dot com
ReplyDeleteAmber
www.lifelovegreen.com
That is so cute and cleaver! Would you mind linking up to Hoo's got talent instead of Hoo are you! Please and thank you!
ReplyDeleteI love that way that turned out. Looks great.
ReplyDeleteGreat idea! Thank you for sharing!
ReplyDeleteVery cool idea. Love the tutorial! Thanks so much for sharing!
ReplyDeleteHi there. I am your newest follower from the Friday blog hop! Lovely blog!! You can find me at www.bouffeebambini.blogspot.com
ReplyDeleteI am following from the blog hop. I hope you can follow me back and checking out my latest giveaways.
ReplyDeleteGod Bless and Happy Friday,
Shelley
http://mylifeadventurebyme.blogspot.com
Neat! Thanks so much for planting your creative seeds at Plant a Punkin Seed party!
ReplyDeleteKristi
Punkin Seed Party
So nice! You made a wonderful project and a REALLY wonderful tutorial. Great photographs and instructions. I love anything recycled, thank you for the great ideas.
ReplyDelete